Pages

Friday, December 31, 2010

IBM HTTP Server Load Balancing Configuration

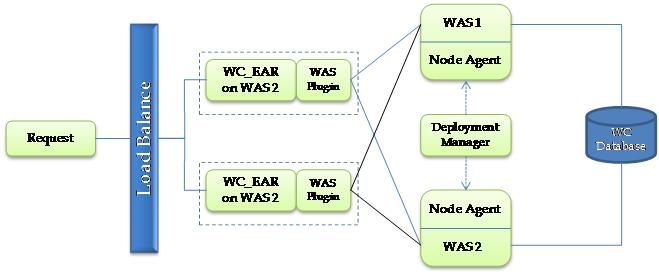
IBM HTTP server can be configured to perform basic load balancing to redirect requests to the websphere commerce server in the server cluster.

For setting up an IBM HTTP server with websphere commerce, you need to install a plugin which creates a plugin-cfg.xml.  This file contains configurations for virtual hosts, server cluster and other configurations.

So to define a load balance configuration for an application server cluster of 2 servers, the following sample settings are shown

<ServerCluster CloneSeparatorChange="false" GetDWLMTable="false" LoadBalance="Round Robin" Name="CommerceCluster" PostBufferSize="64" PostSizeLimit="-1" RemoveSpecialHeaders="true" RetryInterval="60">
     
<Server CloneID="15148o4st" ConnectTimeout="0" ExtendedHandshake="false" LoadBalanceWeight="2" MaxConnections="-1" Name="server1" ServerIOTimeout="0" WaitForContinue="false">
         <Transport Hostname="wcsas01.domain.com" Port="9060" Protocol="http"/>
         <Transport Hostname="wcsas01.domain.com" Port="9062" Protocol="https">
         </Transport>
</Server>

<Server CloneID="15148o50q" ConnectTimeout="0" ExtendedHandshake="false" LoadBalanceWeight="2" MaxConnections="-1" Name="server2" ServerIOTimeout="0" WaitForContinue="false">
         <Transport Hostname="wcsas02.domain.com" Port="9060" Protocol="http"/>
         <Transport Hostname="wcsas02.domain.com " Port="9062" Protocol="https">
         </Transport>
</Server>

<PrimaryServers>
         <Server Name="server1"/>
         <Server Name="server2"/>
</PrimaryServers>

</ServerCluster>

The ServerCluster tag in the above XML snippet defines the servers in the cluster and also specifies the algorithm used for load balancing (in this case “Round Robin”). Each server in the cluster is defined in the Server tag. One of the important attributes of the “Server” xml tag is the “LoadBalanceWeight”.

The value assigned to this attribute will be the starting value for the server weight. The server weight is lowered by the HTTP server dynamically whenever a request is allocated to that server. This will result in the value getting to 0 or lower sooner or later. So setting a lower value like 2 (default is 2) means the LoadBalanceWeight will get to 0 or less very quickly and the HTTP server will readjust the weights when all the LoadBalanceWeight goes to 0 or less very quickly for all the servers defined in the cluster.  Hence, it is recommended to put a larger weight value like 99 in this attribute.

Also, one more point to note is that at runtime, the HTTP server normalizes all the LoadBalanceWeight of all servers defined in the cluster by their highest common factor. For example, assume you have 2 application servers in the cluster and you have set the weight as 100 100. This will result in a weight of 1 after normalization (highest common factor 100). Hence it is advised to keep the weight of at least one of the servers off by a value 1 with others. For example keeping the weights as 100 and 99 for server1 and server2 respectively will not change the starting weights after normalization.

Getting to know Schedulers and Jobs in Websphere Commerce


The scheduler is a background server (runs as a low priority thread) which schedules and runs jobs at the site and store levels.

Some of the key tables are

SCHACTIVE – This contains an active list of jobs that needs to be executed. The scheduler polls this table to find the jobs to run.

SCHCONFIG – This table contains the configuration information for a particular job. The configuration may be an INTERFACENAME of a command to be executed, STOREENT_ID if the job has to run for a specific store (0 for all stores) and you can also specify which node of your application server cluster will run this job by specifying the SCCHOST field in this table.

SCHSTATUS – For each job that is executed, this table contains the status of the job. This table might have huge number of records after a certain amount of time which might impact performance of WCS.

There are three kinds of jobs namely Regular, Store Level and Broadcast jobs. Regular jobs run at site level and are generally Commands that are automatically scheduled to execute at a particular interval. When a regular job is created (using websphere commerce administration console), an entry is made to the SCHACTIVE table with status as I (Has to run at preferred start time). Once the job runs and completes, an entry is made to the SCHSTATUS table.

Store Level Jobs contain a task command that check if the job needs to be run based on certain conditions. When created, an entry to SCHACTIVE table is made with status as W (Waiting for execution).

Broadcast jobs are run by all the websphere commerce servers / nodes connecting to the same database.

To remove job status records from SCHSTATUS table, either login to websphere commerce administration console and delete the status by selecting them or click “Remove All” to delete all records from the scheduler status table.

Tuesday, December 21, 2010

Preventing some URL parameters from encryption in websphere commerce

There are some situations where you would want to prevent certain URL parameters to be encrypted by Websphere Commerce. For example, there was a situation I faced wherein the product detail page displayed the ratings and reviews (BazaarVoice integration). The requirement was that only registered users be able to write a review for a product. Hence, when a guest user clicked on "Write a review" from product detail page, there was a redirect to a secure login page (https). 

This was encrypting the URL parameters required by BazaarVoice into a "krypto" parameter. And when after login, the page redirects back to ProductDetail page, the BazaarVoice section on the page just wouldn't display.

To overcome this, certain parameters required by BazaarVoice had to be unencrypted and part of the URL parameter.

To achieve this, open the wc-server.xml file which is generally found at C:\WCToolkitEE60\xml\config where C:\WCToolkitEE60 is the websphere commerce toolkit installation path. Search for NonEncryptedParameters XML attribute in the file. In this section of the xml, we define all the parameters that should not be encrypted by WCS over a secure connection.

<NonEncryptedParameters>
    <Parameter display="true" name="user"/>
    <Parameter display="true" name="bvpage"/>
    <Parameter display="true" name="return"/>
</NonEncryptedParameters>

Having this will ensure that WCS doesn't encrypt the listed parameters. All the NonEncryptedParameters are appended to the beginning of the URL.

Friday, December 17, 2010

Troubleshooting Websphere Commerce Developer Startup issue

If the following exception occurs starting up the websphere application server test environment in your websphere commerce toolkit 6 then

Caused by: com.ibm.ws.exception.ConfigurationWarning: 
com.ibm.etools.j2ee.commonarchivecore.exception.NoModuleFileException: 
A file does not exist for module element having uri: 
WebSphereCommerceServerExtensionsData.jar.

Do the following
  1. Navigate to WC Folder in your projects explorer view
  2. Right clik on WC project and select close project. 
  3. Once the build completes, right click again and open the project. 
  4. This will again trigger a build and updated the WC enterprise application
Then restart the websphere application server test environment. If this doesn't work then restart the workspace itself.

Thursday, December 16, 2010

Enabling Log and Trace for IBM Websphere Commerce Debugging

WCS logs can be configured using Websphere Application Servers’ Administration Console.

  1. Login to the WAS admin console. Generally, the link for the admin console is

  1. Select  Troubleshooting > Logs and Trace option from the left menu items in the admin console and then click Logs and Trace and select <<server1>> from the screen.
  1. The above step will display general properties for logging and tracing for WAS.
Diagnostic Trace
JVM Logs
Process Logs
IBM Service Logs
Change Log Detail Levels

  1. Select Diagnostic Trace for enabling / disabling log levels and setting the trace output formats (Simple, Advanced or Log Analyzer)
  1. Selecting Change Log Detail Levels  from step 4 above will display all the Components  of Websphere commerce. Trace level can be enabled for a specific  components or for a whole set of components. Various trace levels available are
Off
Fatal
Severe
Warning
Audit
Info
Config
Detail
Fine
All
  1. For example, to enable trace logs for specific components related to webservices, you might want to enable the logs for the following components
com.ibm.commerce.wc.messaging.adapters.jcahttp.JCAHTTPManagedConnectionImpl
com.ibm.commerce.wc.messaging.adapters.jcahttp.ws.JCAHTTPWSManagedConnectionFactoryImpl
com.ibm.websphere.commerce.WC_SERVER
com.ibm.websphere.commerce.adapters.jcahttp
com.ibm.ws.webservices.*
com.ibm.websphere.commerce.WC_MESSAGING
com.ibm.websphere.commerce.WC_TRANSPORT_ADAPTER
com.ibm.websphere.commerce.WC_SENSITIVE_INFO

Once the log levels are changed as per requirement, bounce the application server by issuing stopServer <<server1>>  from the <<AppServerHome>>/bin directory. Before starting the server, ensure that logs folder is cleared so that fresh logs are created.

The above details are valid for IBM Websphere Commerce 6.0 Fix Pack 9, Feature pack 1,2, 4 and 5 and WAS version 6.0.2.27

Overview of Websphere Commerce eMarketing Spots (emspot)


ESpots are specific defined areas on a JSP page whose content can be dynamically configured based on rules. Since websphere commerce version 6.0 and Feature pack 3 onwards, management centre feature can be used to manage ESpots, activities, catalog, and other marketing activities.

Introduced in feature pack 3, eSpot is created in management centre and the websphere commerce tables which are affected are as below

Emarketing Spots are stored in a table named EMSPOT with EMSPOT_ID (system generated), STOREENT_ID (store for which emarketing spot is created) and NAME (name of the emarketing spot) being the unique keys for the table.

There is a field SUPPORTEDTYPES which defines, as the name implies, supported types of things that can be displayed on an emarketing spot. In version 6.0 of wcs,

The types of things that this e-Marketing Spot can display:
A = Awareness ad
P = Product
C = Category
S = Cross-sell or Up-sell on product.
G = General content, which corresponds to a content spot. This value should only be used by the system.

Web activities are defined as rules to display targeted marketing content to customers in predefined e-Marketing Spots. If multiple web activities are configured to display different content on the same marketing spot, then the priority of the web-activity comes into picture.

DMACTIVITY is the table which holds the activity data. DMACTTYPE_ID defines the type of the activity. 0 is default for a web-activity. STOREENT_ID is the store with which activity is associated. STARTDATE and ENDDATE specifies dates between which the web activity is active. STATE field defines whether an activity is active or not.

DMELEMENT holds the details of the campaign elements associated with a marketing activity.

DMELEMENTNVP holds the name value pairs for each of the direct marketing element.

DMELEMENT_ID                 NAME                                                             VALUE                                    TRIGGERMATCH
10,512             collateralIdList             10463              0         
10,513             name                           rootPath          0
10,514             emsId                          10414              1

The collateralIdList specifies what the actual collateral to display is. This is contained in a table COLLATERAL

Monday, December 13, 2010

Problem with Websphere Commerce Server Marketing Spots

Marketing spots are space on a page that are used by the business and marketing team to display the featured products on the website.

I am working on Websphere Commerce v 6.0 with fix pack 9. There are a total of 16 marketing spots on the home page displaying featured products. Every week or so, marketing people use websphere commerce management centre on our staging environment to update marketing spots with new catalog entry items.

There is a stagprop utility batch that runs and propagates all espot associations to our production environment. However, the new product associations with eSpots didn’t show up on our production site. We logged in to commerce administration console and updated the “CampaignInitiativeCache” registry and then cleared the dynamic cache for the eSpots. This should have cleared and updated the eSpots. However, to our surprise, even after updating the registry and clearing the dynamic cache on the server, we couldn’t see the latest eSpot associations on the site. We finally had to restart the complete application server to get the latest eSpot displayed on the page.

We enabled the marketing and cache trace logs and looked at the resulting logs

com.ibm.websphere.commerce.WC_CACHE=all: com.ibm.websphere.commerce.WC_MARKETING=all: com.ibm.websphere.commerce.WC_SCHEDULER=all: com.ibm.commerce.marketing.*=all

We have a cluster of two application servers on our production environment. The logs below indicated that the application server 2 had a stale web-activity cache and server 1 had up to date web-activity cache.

Server 1 Logs
[22/11/10 11:06:00:369 EST] 000013a9 engine        1 com.ibm.commerce.marketing.internal.runtime.engine.RemoteCall remoteCall    activity: id= 14501 name= MAI_MainProduct1 description= null storeId= 10601 campaignId= null campaignName= null state= 1 createdDate= 2010-06-30 16:00:24.931 lastUpdate= 2010-11-16 11:28:08.242 lastUpdatedBy=

Server 2 Logs
22/11/10 11:04:46:506 EST] 000034ff engine        1 com.ibm.commerce.marketing.internal.runtime.engine.RemoteCall remoteCall    activity: id= 14501 name= MAI_MainProduct1 description= null storeId= 10601 campaignId= null campaignName= null state= 1 createdDate= 2010-06-30 16:00:24.931 lastUpdate= 2010-11-08 15:58:18.723 lastUpdatedBy=

On server 2, the webactivity cache for the espot was stale, ie., had an older activity in cache.

With the basic cachemonitor application that was installed, we could only clear the dynamic espot jsp cache. This would only clear the jsp’s associated with the espot. On the other hand the web activities were cached in a separate instance called the DM_CACHE. To view and work with this instance, we had to upgrade our cache monitor to an extended cache monitor.

IBM Extended Cache Monitor for IBM WebSphere Application Server technology preview
http://www.ibm.com/developerworks/websphere/downloads/cache_monitor.html

To upgrade the cachemonitor on WAS 6.0, login to the ibm websphere application server console and select as below


Note: Select the cachemonitor602_update.zip which is available in the cachemonitor602_package.zip archive for application server 6.0 versions

Once updated, save the settings to master configuration. Now you shall be able to see the upgraded dynamic cache monitor.


The DM_Cache caches the marketing elements and activities


Invalidating the DM_ACTV_XXXXX and DM_ELEM_XXXXX updated the eSpots with latest content / catalog entry.

We investigated why updating the registry and clearing the JSP cache didn’t work at the first place and found that the commerce management centre feature was not enabled properly. In the wc-server.xml file, we found that the element “Marketing Version” was set to “Classic”. This should be set to “Dialog” instead. This wc-server.xml setting should look like

<Marketing Version = “Dialog” />

As per IBM infocenter – “This value tells WebSphere Commerce which marketing runtime to use. There are two marketing versions: Classic refers to the pre-Feature Pack 3 marketing runtime; Dialog refers the marketing runtime required for Feature Pack 3 and later feature packs. When you set this value to Dialog, you must use the Management Center Marketing tool for any functions that it supports (campaigns, content, Web activities, e-mail activities, and e-mail templates).”

Following link specifies how and why you need to enable this
http://publib.boulder.ibm.com/infocenter/wchelp/v6r0m0/index.jsp?topic=/com.ibm.commerce.management-center.doc/tasks/tsbenable.htm

Once set to “Dialog”, refreshing the “CampaignInitiativeCache” registry did clear the activities and element cache and updated the espot with new content

But I really wonder why enabling management centre feature didn’t just update the “Marketing Version” to “Dialog” while installation of WCS.

Thursday, December 9, 2010

dbclean utility in IBM Websphere Commerce


Websphere commerce provides dbclean utility to clean up the database tables that have lots of obsolete data. For example, the STAGLOG table contains data of changes that needs to be propagated to the production. In a typical architecture, all changes are made to the staging environment and then they are propagated to the production using the stage prop utility. However, over a period of time, the STAGLOG table is filled up with lots of records and could become a performance issue.

The following is the syntax of the dbclean command.

dbclean.sh / dbclean.bat
-object obj –type s  -instancexml s  -db s  -dbuser s   -dbschema s  -dbpassword s  -dbtype s
-check_object_only s  -comming n –max s   -log s  -loglevel s  -script s  -days s –name s
-jdbcDriver s  -jdbcUrlPrefix s  -jdbcCustomizer s  -sqlmode n

Where

object is the name of the object to be deleted. Websphere commerce defines various objects in the following URL http://publib.boulder.ibm.com/infocenter/wchelp/v6r0m0/index.jsp?topic=/com.ibm.commerce.admin.doc/refs/rduobjects.htm

type of an object is also specified for each object in the above URL.

instancexml is the absolute path of the commerce instance xml file. Usually this can be found at WebSphere/CommerceServer60/instances/<<instance_name>>/xml/<<instance_name>>.xml 

db – Optional - is the name of the database. For oracle type in as host:port:sid

dbuser – Optional – is the owner of the schema or the administrator of the database. If not specified id of user invoking dbclean command is used

dbschema – Optional – is the database schema name

dbpassword – Optional – is the password for the login ID specified by dbuser parameter

dbtype – Optional – specifies the dbtype. Default is DB2.

check_object_only – Optional – checks dependencies between tables if specified as “yes”. For example, an OrderItem might have an owner (user).

Loglevel – Optional - NONE, ERROR, WARNING, NORMAL, INFO/VERBOSE, or DEBUG (Default)


As an example, to delete obsolete objects from STAGLOG table, the following is the command

dbclean.sh  -object staglog –type obsolete –instancexml <<Commerce_Server_path>>/CommerceServer60/instances/<<instance_name>>/xml/<<instance_name>>.xml  -db host:port:sid  -check_object_only yes   –dbtype oracle    -dbuser <<dbuser>>  -dbpassword  <<dbpwd>>
 This will delete all STAGLOG entries with type=obsolete, which means that all records that have STGPROCESSED=1 (already processed) in the STAGLOG table.

I just realized that the attribute "days" is a mandatory attribute for STAGLOG object. Specifying -days 1 means that remove all objects of STAGLOG which are atleast 1 day older.

Tuesday, November 30, 2010

Determining whether a product is “Web-Ready” in Websphere Commerce (WCS) or not


Websphere commerce catalog sub system stores catalog related information in various tables. One such table is the CATGPENREL. This table holds the relationship between a catalog group (which is actually a group of catalog items or category at the store level) and an entity (which is a product from the CATENTRY table).

When there is an association between a category group and a catentry, it means that the catentry (product / SKU) is associated with a catalog group.

Before displaying a product on the frontend Websphere commerce checks if the product is associated with any category for a particular store or not.

There are three mandatory fields in this database table which also form the complex primary key for the table. These are

  1. CATGROUP_ID – This is the unique id of the catalog group (Category)
  2. CATALOG_ID – This is the unique id of the catalog for a particular store. This can be found from STORECAT table
  3. CATENTRY_ID – This is the unique id of the actual produc / sku which is a foreign key on CATENTRY table

The query to check if a product is web-ready or not is

select * from catgpenrel where catalog_id=(select catalog_id from storecat where storeent_id=<<store_id>>) and catentry_id=<<catentry_id>>

<<store_id>> is the unique id of the store in question
<<catentry_id>> is the unique catalog entry (product / SKU) id from CATENTRY table

Tuesday, November 23, 2010

Encoding websphere commerce or websphere commerce build and deploy properties files with sensitive information like userId and password

Encoding websphere commerce or websphere commerce build and deploy properties files with sensitive information like userId and password

Generally, Websphere Commerce Build and Deploy (WCBD) have many properties files containing information about the build and deployment. Usually you would store userId and Password for configuration manager like an svn or a cvs.

To encode properties in a file, follow the steps below

  1. Open a command window and change directory to the application server bin directory.
For example,
C:\RAD601\runtimes\base_v6\profiles\default\bin assuming C:\RAD601 is my RAD installation directory and base_v6 is the websphere 6 installation directory.

  1. Execute the following command

PropFilePasswordEncoder.bat  <<source_file path>> <<properties_to_encode>> [-Backup/-noBackup]

Provide the source properties file path followed by comma separated properties to encode and optionally specify whether the original file has to be backed up or not.

PropFilePasswordEncoder.bat "C:\Documents and Settings\chetanr\Desktop\extract-svn.private.properties" svn.user,svn.password -Backup

In the above example, I have properties file containing svn login information for my websphere commerce build. I need to encode the login information to secure it from being viewable to other users of the system.

This is not a fool proof way for the userid and password to be stored since it is a basic Base64 encoding done by websphere.

Tuesday, November 16, 2010

How to achieve near to zero downtime deployment for WCS in ND mode

Today I will walk through as to how we can achieve a near-to-zero downtime deployment of Websphere Commerce application on production environment with deployment manager (a.k.a node manager).

In my previous posts, I mentioned that the deployment manager holds the master copy of the websphere commerce EAR artefacts.  The deployment manager is responsible for keeping all the nodes, configured with it, synchronized. Any deployments to be done on the production should be done to the deployment manager itself (using the script deploy.sh usually a script that calls an ant task).

Note: Never deploy directly on the node as this may corrupt the EAR.

To achieve a near-to-zero downtime deployment, follow the steps below. The purpose is to make the site available most of the time to the end-users with minimal interruption. For the purpose of simplicity I am assuming here that there are two nodes namely “Node A” for “Server A” and “Node B” for “Server B” and a deployment manager in my environment. Also, I am assuming two webservers “Web 1” and “Web 2” which use round robin method to redirect requests to application server.

  1. Build the websphere commerce zip/ear file using the websphere commerce build and deploy (WCBD) instance.
  1. Before starting the deployment, ensure that webservers are configured to route the requests always to one of the servers, in this case “Server B”.
  1. Stop the node agent on “Node B” so that the deployment manager does not have the status availability for this node. To stop à login to the server (Node B) and issue stopNode.sh / stopNode.bat command. This will not stop the request processing coming through from the web server because the server is still running.
  1. Now use the deployment script to deploy websphere commerce. This script will first deploy on to the deployment manager and then propagate the changes to “Node A” (Node agent on Node B is currently inactive). When the changes are being propagated, the WC application on the server restarts.
  1. Ensure that the propagation is complete. This can be done by looking at the server and application status on the node manager console and also by monitoring the EAR size on the application server. Stop and start the application server A.
  1. Once deployment to “Node A” is complete, configure webservers to redirect all requests to Server A.
  1. Now start the node agent on “Node B”. This can be done using startNode.sh / startNode.bat. Once the node is started, the deployment manager synchronizes “Node B” with the new deployed EAR.
  1. Once the deployment is complete on “Node B”, then configure the webservers to route requests to both application servers in a round-robin way (or whatever is the load balancing algorithm)
Note that the webservers need to be restarted 3 times for the configuration to take effect in step 2, 6 and 8. But this is much faster than restarting the application servers.

Websphere Commerce Deployment Architecture


A.    The deployment manager is a separate independent node that contains the master copy of the Websphere commerce application EAR file

B.    The deployment manager basically is a node manager which manages multiple nodes. In this way, horizontal scalability can be achieved by adding new nodes to the architecture and configuring the node manager to manage the newly added nodes.

C.   For each application server, a node agent is available. The node manager interacts with this node agent to monitor the node and propagate changes to keep the nodes in synch.

D.   All the application servers in the architecture connect to a single Websphere Commerce Database.

Monday, November 8, 2010

Installing Dynacache monitor and enabling servlet caching on websphere application server

Installing DynaCache Monitor and enabling servlet chaching on WCToolkit

Cachemonitor is an EAR application provided by IBM for managing the dynacache of the websphere application server.

Follow the link below which guides how to install cache monitor on Websphere Application Server. The cachemonitor.ear must be part of the installableApps of the websphere application server.

http://publib.boulder.ibm.com/infocenter/wchelp/v6r0m0/index.jsp?topic=/com.ibm.commerce.admin.doc/tutorial/tdcperf1b.htm

How to enable servlet caching

Once cachemonitor is installed, open the ibm websphere application server console.
The URL is generally http://localhost:9060/ibm/console

Click the servers => application servers option
Select the server (generally server1)
Expand the container settings section and then select web container
Now select the checkbox named “Enable Servlet Caching” to enable servlet caching.

Friday, November 5, 2010

How to expand or collapse EAR on Websphere Application Server

EARExpander

This command is used to either expand the Enterprise Archive in to a file system or collapse the application files into a single EAR file.

The syntax is

EarExpander -ear earName -operationDir dirName –operation <expand | collapse> 
[-expansionFlags <all|war>]

Where
-       earName specifies the source EAR file name if it is a expand operation or output EAR file name for collapse operation
-       operationDir specifies the directory where EAR needs to be expanded or a directory from where EAR needs to be collapsed in to a file.
-       expand or collapse option to either expand an EAR or collapse a directory to a EAR
-       an optional expansionFlags
o   all - expand war’s, rar’s.
o   war – to expand only .war

Thursday, November 4, 2010

Adding a certificate to server trusted store

Setting up digital certificates for Websphere Commerce

There is almost always going to be situations where your websphere commerce instance would need to interact with various external systems like payments, fulfilment, inventory systems. The interactions between external systems would almost always be through a secure channel (https, sftp, etc).

For example, to set up websphere commerce as a webservice consumer, we need to trust the certificate presented by the server hosting the webservice else you will get a SSLHandshakeException.

There are two ways to do this.  One way is to update the cacerts in the websphere application server path. The cacerts file is the trusted store for the websphere application server and is available at the path C:\RAD601\runtimes\base_v6\java\jre\lib\security assuming that C:\RAD601 is your RAD installation.

To update the cacerts, follow the steps below:

  1. Copy the certificate file (usually .pem or .cer) file to a temporary directory in your local drive

  1. Change directory to C:\RAD601\runtimes\base_v6\java\jre\bin

  1. Run the following command
keytool –import –v –keystore C:\RAD601\runtimes\base_v6\java\jre\lib\security\cacert –alias AliasName –file c:\file.pem
Assuming that C:\RAD601 is the RAD installation directory and base_v6 is the websphere application server instance directory.
AliasName is the name for the certificate in the trusted store.
C:\file.pem is my certificate file.

  1. Enter default password as “changeit” when prompted

  1. Type “yes” if you are prompted whether to trust the certificate or not

  1. You will see a message like “Certificate was added to keystore” if it was successful.

The second way, and the preferred way, to trust the certificate is as given below

  1. Change directory to C:\RAD601\runtimes\base_v6\java\jre\bin and execute ikeyman.exe

  1. The IBM key manager window opens as shown above. 
  1. Select Open (2nd Icon) and the open window appears. Now click on browse and traverse to the wasprofile\etc directory in websphere commerce toolkit path. Assuming C:\WCToolkitEE60 is the websphere commerce toolkit installation directory.

C:\WCToolkitEE60\wasprofile\etc


  1. Select the DummyServerTrustFile.jks and then select Open

  1. Enter default password as “WebAS”

  1. Click on Add to add a new certificate to the trust store. Select Browse and traverse to the certificate path and then select the certificate and click OK

  1. Now the certificate is added to the Dummy certificate trust file in websphere commerce.

  1. Now we need to tell websphere application server about the DummyServerTrustFile.jks. This can be done by opening the websphere application server console on the browser and login
          Usually http://localhost:9060/ibm/console
  1. Select Servers à Application Servers and then select the server (default is server1).

  1. Once the server configuration properties are displayed, select Java & Process Management option. Under that select the Process Definition option and then Java Virtual Machine from the Additional properties

  1. Enter the following in the Generic JVM arguments space and then restart the application server
-Djavax.net.ssl.keyStore=C:\WCToolkitEE60\wasprofile\etc\DummyServerTrustFile.jks -Djavax.net.ssl.keyStorePassword=WebAS -Djavax.net.ssl.trustStore=C:\WCToolkitEE60\wasprofile\etc\DummyServerTrustFile.jks -Djavax.net.ssl.trustStorePassword=WebAS

This will enable the websphere commerce trust store to be established in websphere application server.

Wednesday, November 3, 2010

WCS 6 Installation primer

  • Install RAD 6.0 from disk1 of the installation folder. Ensure that you install it to a folder which has a short path. For example C:\RAD6
  • Once RAD 6.0 is installed, update the Rational Product Updater from v6.0 to 6.0.1 or 6.0.2 (rpu_602.zip).
  • Install Rational Application Developer Fix Pack 6.0.1.2 (http://www.ibm.com/support/docview.wss?rs=2042&uid=swg24016331) which is a cumulative fix pack. There are three packages for this - rad60_6011_for_6012.zip, radpre60_6012.zip and rad60_6012.zip. It is recommended that you can choose to install from IBM update server automatically rather than downloading the fix.
  • Once the update is done, download and unzip WAS refresh pack 2 - 6.0-WS-WAS-WinX32-RP0000002.zip which can be found at http://www-01.ibm.com/support/docview.wss?uid=swg24009813&rs=0&cs=utf-8&context=SSEQTP&dc=D400&q1=refreshpack&loc=en_US&lang=en&cc=US. Unzip to location where RAD is installed. For eg:- C:\IBM\Rational\SDP\6.0\runtimes\base_v6. This will create a updateinstaller folder.
  • Run update.exe from the updateinstaller folder. This will backup java and relaunch the update installer to install the refresh pack v6.0.2.
  • Now from the updateinstaller for WAS, select Optional Features and select “IBM WebSphere Application Server V6.0 Integrated Test Environment Update Version 6.0.2.5” and “Java SDK Update for IBM WebSphere Application Server V6.0.2.5 Integrated Test Environment” and install the selected features.

From this point, there can be two paths/ways to continue installation of Websphere Commerce.

  
Commerce Installation path1
  • (a) Download and install the UpdateInstaller 7.0.0.11 7.0.0.11-WS-UPDI-WinIA32.zip for websphere application server.
  • (b) Using the above UpdateInstaller, install the following three maintenance packs:- 6.0.2-WS-WAS-WinX32-FP00000043.pak, 6.0.2-WS-WASJavaSDK-WinX32-FP00000043.pak and 6.0.2.5-WS-WAS-IFWC-file-permission3.pak.
  • (c) Install the Websphere commerce using the following command line
a.     setup.exe -cp:p C:\MyData\chetan\Environment_Setup\LI71397_devinstall.jar
This is required as WCS expects WAS version to be 6.0.2.5. However, we have updated the WAS server to version 6.0.2.43 and hence the above fix while installing WCS.
  • (d) Once WCS is installed, install the Websphere Commerce update installer download.updii.61011.windows.ia32.zip and install it to a folder on the file system. This is required to apply fix packs to WCS
  • (e) Download and install the latest fix pack for WCS (Fix Pack 10 (6.0.0.10)) from the URL http://www-01.ibm.com/support/docview.wss?uid=swg21414685.
  • (f) Using the Websphere Commerce update installer (61011), apply fix pack downloaded in the above step.
  • (g) Download Feature packs 1, 2 and 4 sequentially in that order and then install by unzipping the feature packs and executing install.windows.ia32.exe from the unzipped folder.
  • (h) Download couple of coremetrics fixes for Websphere Commerce from the same location (LATEST - 4.0.0.0-WS-WCFeaturePack4-IFSI32088) and (SI32088 - 1.0.0.0-WS-WCFeaturePack1-IFIZ18527) and install them using the websphere commerce update installer.
  • (i) Download and install Feature pack 5 by unzipping the feature packs and executing install.windows.ia32.exe from the unzipped folder.
  • (j) Enable the services in Websphere commerce by executing the following commands from c:\WCToolkitEE60\bin
a.     enableFeature.bat -DfeatureName=component-services
b.    enableFeature.bat -DfeatureName=jca4webservices
c.     enableFeature.bat -DfeatureName=management-center
d.    enableFeature.bat -DfeatureName=madisons-starterstore
  
Commerce Installation path 2 (After WAS level is at 6.0.2.5)
  • (a)  Install websphere commerce using setup.exe from the installation folder. Install to C:\WCToolkitEE60\
  • (b) Once WCS is installed, follow steps d to f from the path 1 described above.
  • (c)  Then follow step g above. However, for installing FEP1, FEP2, FEP4 and FEP5 for WCS, it requires the application server to be at a level of 6.0.1.27. Update the websphere application server to the level by applying the fix 6.0.2-WS-WASJavaSDK-WinX32-FP00000027.pak and 6.0.2-WS-WAS-WinX32-FP00000027.pak and then continue with step g through j above.